
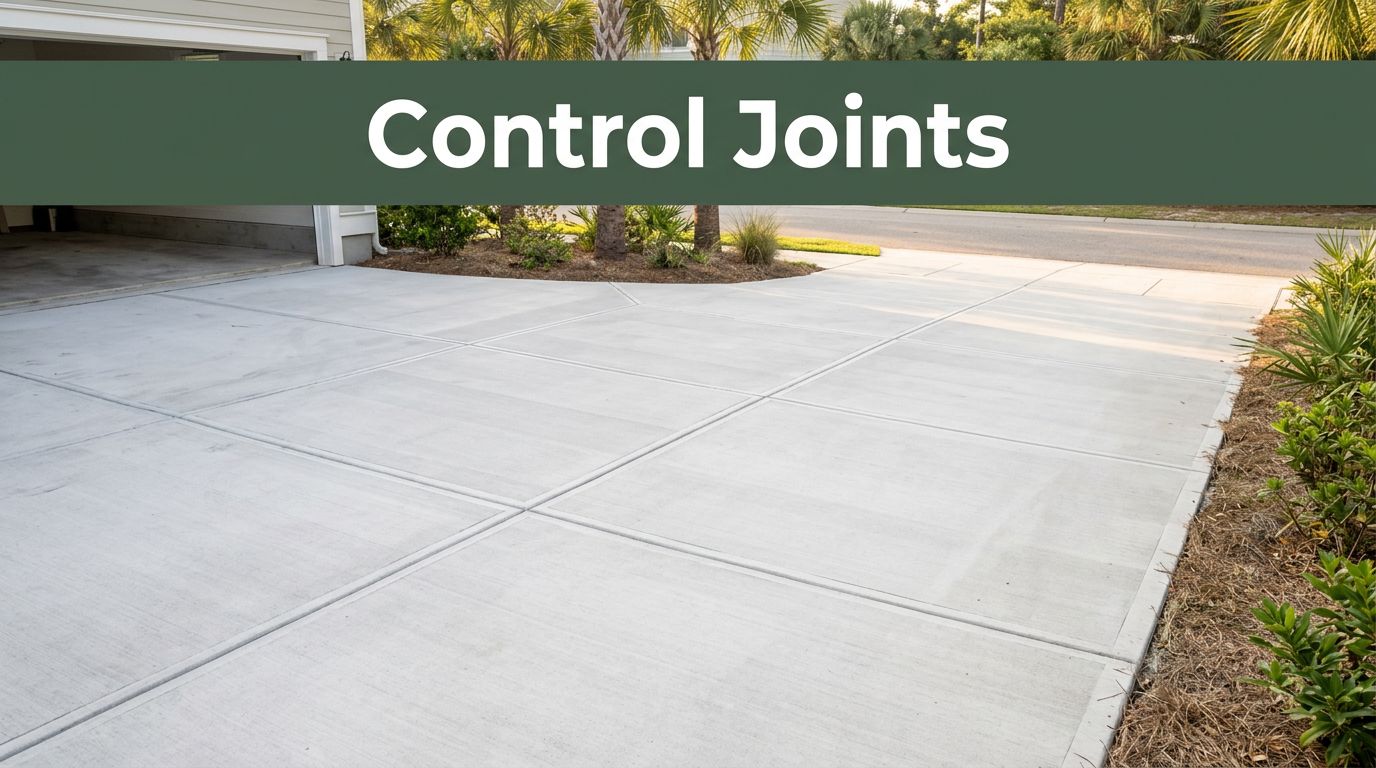
A concrete driveway can look perfect on pour day and still develop a random crack months later. In Charleston, heat, heavy rain, changing moisture, and shifting fill can put added stress on a slab. Concrete driveway control joints give that stress a planned path. Their location, depth, and timing matter as much as the concrete mix itself. A good layout starts before the pour, with attention to driveway width, curves, the garage, the street apron, drainage, and Lowcountry soil.
Key Takeaways
- Place control joints so driveway panels stay close to square, usually on a grid of about 8 to 12 feet.
- Cut or tool each joint to at least one-quarter of the slab depth.
- Put joints at changes in width, corners, curves, and connections to other concrete.
- Use isolation or expansion joints beside the garage, house, sidewalk, and other fixed structures.
- Good subgrade preparation and drainage matter because joints can’t correct settlement.
Why a Charleston Driveway Needs Planned Joints
Concrete shrinks as it loses moisture during curing. Temperature changes also cause the slab to expand and contract. Since concrete has high compressive strength but limited tensile strength, stress can create a crack when the slab has no planned relief point.
A control joint creates a weakened plane inside the slab. When the concrete moves, the crack is more likely to form beneath that groove instead of across the visible surface. The joint doesn’t stop concrete from cracking. It helps control where the crack appears.
The joint must reach deep enough to guide the crack. For a typical 4-inch residential slab, the groove should be at least 1 inch deep. A contractor can form the joint while finishing or saw-cut it after the surface has gained enough strength.
The National Ready Mixed Concrete Association’s CIP 6 guide explains the difference between contraction joints, construction joints, and isolation joints. Those terms matter because each joint has a different job.
A control joint is not the same as an expansion joint. Expansion material belongs where the driveway meets a fixed structure, such as the garage slab, foundation, steps, or sidewalk. That material allows movement between separate elements. Control joints divide one slab into planned panels.

A driveway with no joint plan may crack at the narrowest section, the inside corner of an L-shape, or the point where a vehicle repeatedly turns. Those cracks can look random, but they often follow predictable stress patterns.
Where Control Joints Should Go
The first goal is to divide the driveway into manageable panels. For a residential slab around 4 inches thick, many layouts use joint spacing between 8 and 12 feet. A practical driveway spacing reference also places common residential spacing in that range.
The exact distance depends on slab thickness, reinforcement, driveway shape, base quality, and expected loads. Heavier vehicles and thicker slabs may need a different layout. A contractor should calculate spacing instead of applying one number to every property.
Panels should be close to square. Long, narrow rectangles create more stress because their length is much greater than their width. As a general planning rule, the length of a panel should not be more than about one and a half times its width. Square or modestly rectangular sections usually perform better.
A driveway that is 12 feet wide may need one transverse joint across its width every 8 to 12 feet. A wider driveway may also need a longitudinal joint running with the direction of travel. That joint divides the slab into narrower panels and reduces the chance of a long, uncontrolled crack.
Place joints at every change in the driveway’s shape. That includes:
- The inside corner of an L-shaped or widened driveway
- A transition from a narrow drive to a parking pad
- A curve or sharp bend
- A change in slab thickness
- The end of a driveway apron
- A connection to a sidewalk or patio
- Areas around drains, utility covers, or other interruptions
Corners deserve close attention. An inside corner concentrates stress, so a joint should continue through that corner or be arranged to divide the area cleanly. Stopping a joint short of the corner can leave a small unplanned panel that cracks toward the opening.
The driveway apron also needs its own plan. The section near the street may experience turning loads, edge wear, or a different base condition than the main drive. If the apron connects to a public sidewalk or curb, the joint pattern should respect those existing lines rather than forcing an awkward angle through the slab.
A construction math demonstration for locating joints shows how slab dimensions can guide a practical layout. On a real Charleston property, the contractor also needs to account for drainage and the existing grade.
Charleston Conditions Change the Layout
Charleston driveways deal with more than concrete shrinkage. Many properties contain sandy soil, placed fill, soft spots, or areas that hold water after storms. A well-spaced joint pattern helps manage shrinkage, but it can’t repair a weak base beneath the slab.
Before concrete arrives, the crew should remove unsuitable soil, compact the subgrade in controlled lifts, and place a properly compacted stone base where the site requires it. The finished base should support the full driveway instead of leaving isolated areas that compress under tires.
Drainage also affects performance. Water that collects beside or beneath the slab can wash out support, soften the soil, or increase settlement. Driveway grading should move water away from the garage and house while working with swales, curbs, storm drains, and the street connection.
Charleston’s heat can speed surface drying. Wind and direct sun can increase moisture loss while the concrete is setting. Proper curing, timely joint cutting, and control of the pour schedule help reduce early cracking. A hot afternoon pour needs different attention than a cool, cloudy morning.
Tree roots create another planning issue. Large roots near the driveway can lift concrete or interfere with excavation. Cutting roots without a plan can damage the tree or leave the slab unsupported. The layout may need to adjust around established trees, drainage structures, or property constraints.
The same principles apply to related projects. A stamped concrete patio in Charleston needs joints that follow its pattern without creating distracting breaks. Pool deck concrete in Charleston needs joints placed around the pool shape, coping, drains, and changes in elevation. Concrete slab installation in Charleston requires the same attention to panel size, base support, and fixed connections.
A Lowcountry concrete contractor should also understand local design choices. Tabby concrete in Charleston has a distinct oyster-shell appearance and may be used for selected walkways, patios, or historic-inspired features. Its decorative character doesn’t remove the need for a sound joint layout.
Joint Placement Around Edges and Connections
The driveway should usually be separated from the house foundation and garage floor with an isolation joint. These structures may move at different rates. A flexible joint filler creates space between them and reduces the chance that the driveway will push against the building.
The same approach applies where the driveway meets a sidewalk, retaining wall, porch, steps, or an existing slab. A control joint can divide the driveway itself, but it shouldn’t force movement into a separate structure.
At the driveway edge, the joint pattern should meet the forms cleanly. Joints that end several inches from an edge can leave an uncontrolled triangular section. That section may crack toward the joint or toward the edge.
Avoid placing a joint directly through a drain opening unless the layout is designed for it. Drains interrupt the slab and can create stress around the frame. The surrounding concrete needs adequate support, correct slope, and a joint arrangement that doesn’t leave thin wedges.
Decorative finishes require extra planning. A broom-finished driveway can accept a straightforward grid. A stamped surface needs joints aligned with the pattern, borders, and major architectural lines. Poorly placed cuts can interrupt the design or make one panel noticeably smaller than the others.
For work that includes a driveway, walkway, patio, or slab, review the full scope through Charleston concrete services before choosing a finish or layout. The joint plan should fit the complete project rather than treating each slab as an isolated piece.
What a Quality Installation Should Include
Joint placement is only one part of a durable driveway. The crew should mark the proposed layout on the prepared base before placing concrete. That step allows everyone to see how joints will line up with garage openings, property edges, curves, and transitions.
During the pour, the finishing crew needs enough time to strike off, bull-float, edge, and finish the surface without adding excess water. Water added at the surface can weaken the concrete and increase shrinkage. The correct finish depends on the use, but a driveway usually needs texture that provides traction without leaving rough, uneven edges.
Formed joints should have consistent depth and alignment. Saw-cut joints should be made as soon as the slab can support the equipment without raveling. Waiting too long can allow random cracks to form before the planned cuts are complete.
Reinforcement can help hold a crack tightly, but it doesn’t replace control joints. Steel, fibers, or welded wire should be placed at the specified position and supported during the pour. Reinforcement that rests on the ground won’t perform as intended.
Ask the contractor to confirm these points before work begins:
- Planned joint spacing and depth
- Slab thickness and base preparation
- Isolation joints at buildings and existing concrete
- Drainage and finished slope
- Curing method and saw-cut timing
- Access for vehicles during the curing period
A reputable concrete contractor in Charleston, SC should explain the plan in plain language. If the project includes a standard concrete driveway in Charleston, SC, the layout may be simple. A sloped, curved, widened, or decorative driveway deserves a site-specific drawing.
When you compare a concrete contractor Charleston SC property owners are considering, look for clear answers about preparation and joint locations. Price matters, but a low bid that leaves out base work or proper cutting can cost more after the first major crack.
Final Thoughts
The best place for a control joint is where it divides the driveway into balanced panels and follows the slab’s natural stress points. Keep panels close to square, cut joints deeply enough, and separate the driveway from fixed structures.
Charleston conditions make preparation especially important. Stable support, good drainage, correct curing, and a planned joint pattern work together. When those details receive attention before the pour, your concrete driveway control joints have a better chance of directing cracks where they belong. For project-specific planning, Get a Free Quote from a local crew familiar with Lowcountry sites.

